Safe Place
The Safe Place is a visualization exercise, variations of which are used in EMDR, hypnotherapy, somatic experiencing, and other healing systems.
My invitation to you:
Play with expanding your capacity for feeling relaxed, calm, and good enough, through the following Expressive Arts-based explorations. Please remember, as always, all steps are optional invitations, for you to incorporate as you see fit, if they are sparking your curiosity and playfulness, and feel safe to you.
Materials and Supplies:
a box of any size or shape that you can decorate, such as a shoebox, mint tin, or even a jar. Important is to be able to decorate both the inside and the outside
Paint, paint pens, and/or collage materials and glue for decorating
Part 1: Set an Intention Related to Feelings of Safety
Write down a few intentions for why you might like to explore feelings of safety.
I want to feel safety more profoundly in my body so that…
I’d like to feel safe to…
I want to anchor sensations of safety…
I want to secure…
I want to safeguard…
I want to feel deeply sure of…
Part 2: Movement Exploration
Find a comfortable stance or seated position for doing some easy Self-Contact explorations, circa 5 minutes.
Step one: Place Hands
Rub your hands together to energize them and create some warmth. Then place your hands in different places around your body, just allowing your own warmth and contact to seep into your body. If it feels authentic, maybe say hi to yourself directly, or say “I am saying hello to myself”, to underscore your friendly contact with yourself.
Step Two: Gentle & Slow Bilateral Tapping
Using Artigas’ Butterfly Hug technique, do a few cycles of very light, slow tapping. If you aren’t familiar with the butterfly hug, you’re in for a treat! (Not everyone responds to it though, so if that’s you don’t sweat it).
Cross your hands over your chest around your collar, linking thumbs to create a hinge. The middle and pointer fingers of each hand may rest on or near the collarbones of the opposite side of the body. Slowly & gently alternate tapping each collarbone, “flapping the wings” of the butterfly. Using your felt sense, determine the pace that feels best to you for today. Keep in mind that in general for safety we want to slow waaaaaaay down. 4-8 taps per side is plenty, and don’t forget to notice any sensations and any signs of parasympathetic nervous system activation, such as a spontaneous deep breath, yawn, watery eyes, automatic body movement or stretch, etc.
Step Three: Safety Pose
Finally, end the Movement Exploration portion today by finding one posture that feels like safety to you. One tip is to allow, rather than fight, “bad posture”. It could be that contracting inwards, with your arms wrapped around your torso feels safest today. We have many, many good reasons, for finding safety in more tucked in, curled up positions. Curling up is soothing and containing.
On the other hand, you may feel safer today in a confidence-generating posture signaling readiness to defend yourself, such as Superhero Pose (standing like Superman or Wonder Woman - hands on hips, legs in a wide stance, chest open).
Whatever your body shows you for today’s safety posture, go with it.
Part 3: Do A Safe Place Visualization Exercise
Now do a short visualization to create an inner Safe Place using your powers of imagination.
You can do this intuitively on your own, with a guided audio from other healers on the web, or following my written guide, which you can read through here:
Feel free to adapt and experiment as feels right for you. The goal is to build safety, which involves halting the habit of overriding and ignoring inner signals of distress, rather than pushing through. So honor your inner system, and listen to whether or not this is feeling helpful or whether it is scary or falling flat for you.
Part 4: Build a 3d Safe Place Sculpture
Now we use art materials, following our intuition, to fashion a 3d representation of our Safe Place. It does not need to be literal in any way, it can just, without thinking about it very much, capture something of our experience with the Safe Place explorations. Making any art with Safe Place as a loose intention will help you anchor a Safe Place into your nervous system.
Many find that using a cardboard box or other type of container fits well to the exercise, but it can also be done as a 2d painting or drawing, or something else that feels right for you!
Note that you can do this as a standalone exercise without having done the first steps, but doing steps 1-3 will probably enhance your resonance with this experience.
Using your selected box or container (or other ground), decorate the inside and the outside, as intuitively guided. Feel free to incorporate words.
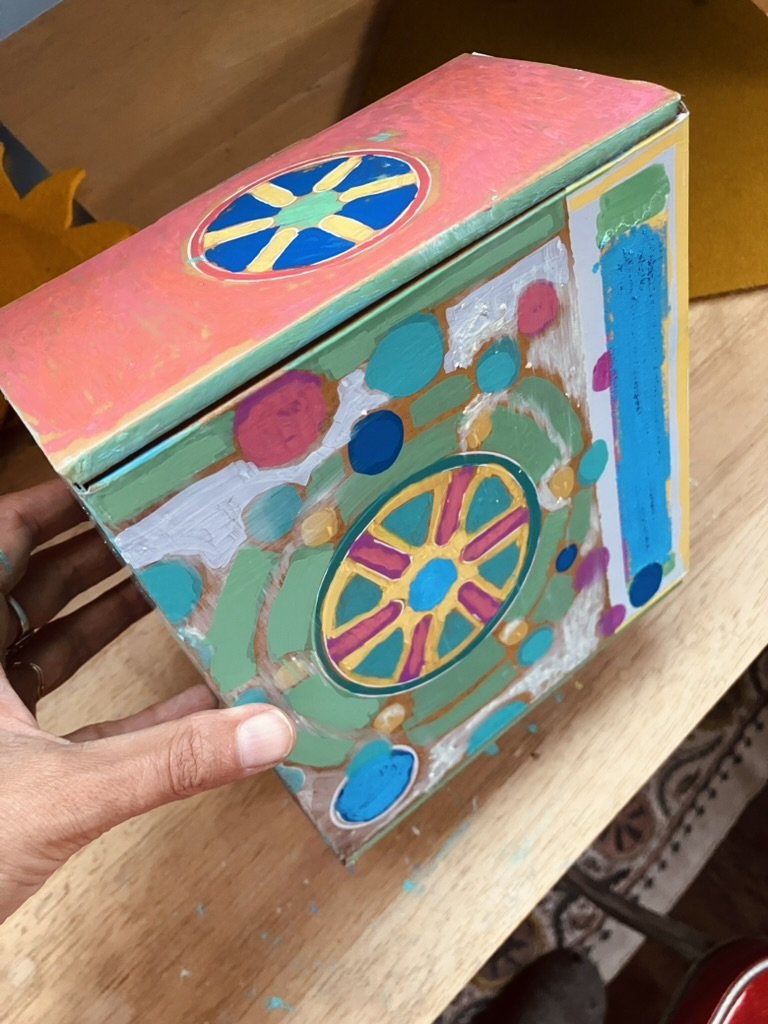
The following pictures show my sample Safe Place box in various stages; I started with painting a box I liked (unfortunately I didn’t capture it in its unpainted state, so the first image shows my first layer of paint already). I started with the inside, then worked to decorate every available surface with colors, shapes, and symbols that seemed to echo something of the feeling of the Safe Place visualization experience. I finished with adding collage materials and some words on the inside.
You do not need to follow what I did in any way; however you are intuitively guided to do this project is right.


Part 5: Dialogue to Reflect
Before finishing your process today, you may want to dig a little deeper into what you have uncovered for yourself about your inner Safe Place, through written dialogues. If desired, use the following prompts:
How do I feel as I look at my Safe Place piece? What sensations, emotions, and thoughts arise in response?
If my Safe Place piece is carrying a message for me today, what is it telling me?
What do I want to say to my Safe Place, if anything?
Thanks for engaging. Lots of love,
~Holly Mae
(((((((((((((((((((((((((((((((((((((|||||||||||||||||||))))))))))))))))))))))))))))))))))))))))
Special thanks to Dr. Cathy Malchiodi & Dr. Elizabeth Warson of the Trauma-Informed EXA Institute for recent inspiration specifically about this topic, and for helping me understand the power of bilateral stimulation better. Another thank you goes out to my own sweet EXA therapist Natalie Cruz, who first did a similar exercise with me a decade ago. Also, to my professors at CIIS who taught me this tool back in the day. Finally, recognition and acknowledgement to the many, many contributors, known and unknown to me, to the fields of EMDR, hypnotherapy, somatics, and expressive arts therapies. Thank you One and All!